首页 About Us Products News Feedback Certificate Contact Us
  You are here: eMPPT30 Solar Charger controller  


eMPPT30 Solar Charger controller

eMPPT30 Solar Charger controller


Features:
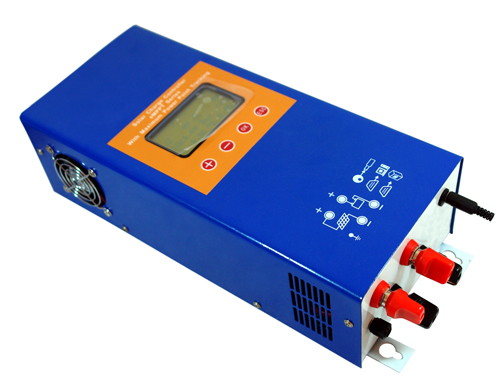
The product adopts DC/DC converting technology and MCU technology. It can adjust the working point of the solar panels array intelligently to make the solar panels array realize the maximum power output. When the external condition changes, eMPPT controller bases on the MCU theory to track the maximum working point of the solar panels, this can improve the using efficiency of the solar panels and decrease the solar generating cost. Compared with average solar charge controllers, eMPPT can improve the output efficiency of the solar panels by 5% to 30 %( the output increasing proportion affected by the factors such as the attribute of the solar panels, environmental temperature and lighting conditions). The product adopts in big screen lattice LCD, and uses the vivid icons to indicate the parameters. It has concise and vivid interface. The product is wall mounting installation. Please refer to chapter 2.1 for the installing dimensions.
Product functions


Functions
instruction
1
maximum power point tracking
Adopting DC/DC converting technology and MCU technology to realize the maximum output of the solar panels
2
battery reversed connection protection
Battery polarity connecting to the controller reversely (under the condition not connecting solar panels) will not cause damage to controller. It can work normally after connecting right.
3
Anti-battery reverse discharge
When solar panels voltage is less than battery voltage, the battery will not charge to the solar panels array.
4
Anti-solar panels reverse connection
Solar panels array polarity connecting to the controller reversely will not cause damage to controller. It can work normally after connecting right
5
three-stage charge control
Bulk Absorption Float
6
float charging voltage adjustable
The users can adjust the float charging voltage within a certain scope.
7
temperature compensation for float charging voltage
Referring to the current battery temperature, take 25 as a benchmark, the controller will compensate the float charging voltage by -4mV/Cell/℃. For 12V battery, compensation voltage U=(t-25)*6*(-0.004)VFor 24V battery, compensation voltage U=(t-25)*12*(-0.004)VFor 48V battery, compensation voltage U=(t-25)*24*(-0.004)V
8
Elevating charging voltage adjustable
The users can adjust the elevating charging voltage within a certain scope
9
solar panel input deviated from maximum power point
When solar panel input power is over the acceptable power for the controller, the controller will make the solar panel work deviated from the maximum power to prevent itself damaged. So the controller charges the battery by rated current.
10
internal overheating protection
When the internal temperature sensor detects excessive temperature, the controller will stop working to prevent it being damaged. It will resume working again when the internal temperature drops to a certain degree.
11
temperature controlling fan
When the internal temperature sensor detects the temperature exceeding a certain degree, the controller will start the cooling fan until the temperature drops to a certain degree.
12
panel over voltage protection
When the input voltage of the solar panels exceeds the rated voltage, the controller will start protection automatically and stop working until the input voltage resumes back to the normal scope.
13
remote controlling function
This optional function can make it possible to view and set the parameters of the system on PC.


Technical parameters

model
eMPPT3024Z
eMPPT3048
input
solar panel input voltage scope
≤70V
≤130V
maximum power point voltage tracking scope
12V~70V12V
48V~130V
24V~70V24V
solar panel input route
1 route
1 route
output
rated working voltage
12V/24V auto switch
48V
maximum charging current
30A
30A
no load loss
≤45mA
≤45mA
charging mode
Bulk Absorption Float
float charging voltage
27.6Vadjustable
55.2Vadjustable
temperature compensation for float charging voltage
-4mV/cell/
-4mV/cell/
absorption charging voltage
28.8Vadjustable
57.6Vadjustable
temperature scope
-20+70
-20+70
others
protection functions
battery reverse connection function
battery reverse discharging function
solar panel reverse connection function
solar panel input over voltage protection
radiator overheat protection
input over power deviated from maximum power point
cooling way
thermostat active cooling
optional function
RS485 or RS232remote controlling function
working temperature scope
-10+50
working altitude
≤3000m
working humidity scope
090% no condensation
volume
380mm*150mm*100mm
weight
2.5 Kg
2.6 Kg
storage temperature scope
-30+80


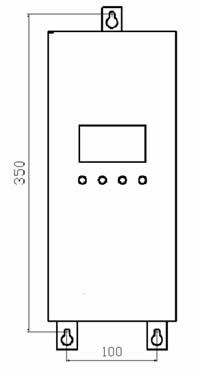
 Installing dimension
We suggest installing the controller on the vertical wall, and ensure there is the space over 10cm around the controller for heat emission.
1. We suggest the user to use the sheathed cable with the cross-sectional area over 6mm2.
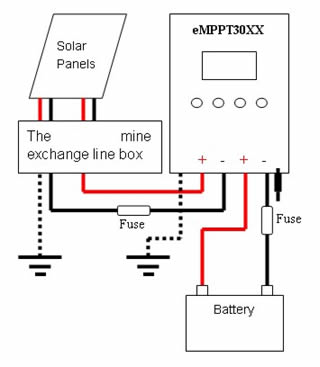
2.  We suggest installing breaker and fuse on the negative loop of battery and solar panels.
3. Set the controller’s ground terminal to reliably connect to the system ground bus.
4. The capacity of the controller internal over voltage absorption is limited. Please make sure connect the solar panel to the controller after connecting to the mine exchange line box.

eMPPT30 Solar Charger controller

eMPPT30 Solar Charger controller


Wire & tool preparation
Prepare 6 mm2 black and red sheathed cables, each one roll.  Prepare several copper noses ofФ6-6mm2 since controller adopts inФ6 terminals
Hydraulic pliers(for crimping copper nose and cable) and 6 mm2 die, one couple, 10mm wrench, 2 sets, Phillips screwdriver, 1 set, cutting pliers, 1set
Cut the cables according to the cabling requirement. Use hydraulic and die to connect the copper nose and cables tightly, and prepare all the cables well.

Installing process
If breaker is installed in the battery loop, please make the breaker open. If fuse is installed, please take out the fuse to prevent the phenomena of contact ignition.
Use the prepared cables to connect the +,- polarity of battery to the battery terminals on the controller. Please make sure the connecting of the polarity is correct.
Use the prepared cables to connect the solar panel output of the main convergence box to the solar panes terminals on the controller. Please make sure the connecting of the polarity is correct.
Use the prepared cables to connect the ground terminals to the ground box of the system.
Insert the temperature sensor to the right place on the controller.
Close the breaker of the battery loop or insert the fuse of the battery loop, if the controller LCD screen starts to show the signal, the controller will start to work. And if the LCD has no signal, please check whether the connecting of the polarity is correct, whether the connecting cables is in good condition, whether the breaker is closed, whether the fuse is inserter. Wait until the LCD has signal, and then go to next step.
Close the breaker of the solar panels loop or insert the fuse of the solar panels loop, then the controller LCD screen will show the solar panels voltage. If the LCD shows the voltage is 0V, please check whether the breaker in the solar panels loop is closed.


Copyright© Yueqing Supower Electric Co., Ltd. Sitemap Directly buy SUPOWER inverter from http://www.aliexpress.com/store/410860
POWER INVERTER | PURE SINE WAVE INVERTER | GRID TIE INVERTER | Alibaba | Supowerelec